Denver Green Chile Dog With Enough Cheese to Start an Argument
This Denver inspired green chile dog works when you build it in deliberate layers, not when you dump a small landslide into a bun and hope for diplomacy. It is for hot dog enthusiasts and curious home cooks who want hot chile, melted cheese, and a bun that remains a bun instead of becoming a damp napkin.
- Build in layers so every bite gets hot dog, green chile, cheese, and bun.
- Use a split, lightly toasted bun that can handle moisture without collapsing.
- Put cheese against the hot dog and hot chile so it actually melts.
- Spoon on enough chile for flavor and moisture, but do not turn the first bite into soup.
- Think of this as a Denver inspired home recipe, not one official Denver formula.
Why this Denver inspired green chile dog needs a layering plan
Layering matters because green chile is loose and wet, cheese needs direct heat, and the bun needs structural support. The best version is not the tallest topping pile. It is the one where each bite carries a sensible ratio of frank, chile, cheese, and toasted bread.
That ratio is bite consistency: the first bite should not be plain bun, the middle should not be a sauce ambush, and the last bite should not be a lonely nub of bread holding a teaspoon of regret. Spreading each element along the dog keeps flavor from one end to the other.
This recipe takes inspiration from Colorado green chile culture, where green chile has a serious place at the table. It is not a declaration that every Denver dog follows one sacred build. Food cities contain multitudes. Some of those multitudes are wearing cheese.
Jason's position is simple: no ketchup here. Its sweet tang pulls attention away from the smoky, peppery chile and creamy cheese. The chile has already brought enough personality.
The ingredient lineup, with no ketchup apology tour
Keep the ingredient list focused so green chile remains the main event, not one confused member of a condiment committee.
- Hot dogs: Choose franks with a pronounced snap and enough savory flavor to stand up to chile and cheese. Cook them by your preferred method until hot throughout, following package instructions.
- Buns: Use sturdy split top or side split buns. Light toasting gives the bread a little resistance against the chile without turning it into crouton territory.
- Green chile: Use prepared Colorado style green chile or homemade green chile sauce. Taste it before building because chile heat and salt levels can change from batch to batch.
- Cheese: Monterey Jack, cheddar, or a blend all work well because they melt readily. This is a recipe choice, not an authenticity tribunal.
- Optional finishers: Finely chopped onion or cilantro can add freshness. Use a small amount. If the garnish is louder than the green chile, it has missed the assignment.
The build order that keeps the bun alive
Toast the bun, create a thin flavor base, add the hot dog and cheese, then spoon green chile over the center instead of flooding the ends. Warm ingredients are the quiet secret here, because cold cheese placed on a finished dog has the emotional warmth of office carpeting.
- Warm the green chile in a small pan until hot. If it is very loose, let it simmer briefly until it thickens enough to cling to a spoon.
- Cook the franks according to their package instructions. Keep them hot while you prepare the buns.
- Lightly toast the inside faces of each bun. A skillet, grill, or toaster oven works. The goal is gentle crispness, not dark scorch marks.
- Add a restrained base layer. Use either a small spoonful of green chile in the bottom of the bun or a light scattering of shredded cheese. This gives the dog flavor from below without soaking the bread.
- Set the hot dog into the bun, centered from end to end.
- Add cheese directly against the hot dog. Use shredded cheese under the chile, or place a slice along the side of the frank.
- Spoon hot green chile down the length of the dog, keeping the ends mostly clear so the dog remains easy to hold.
- Finish with a modest pinch of onion or cilantro, if using, and serve immediately.
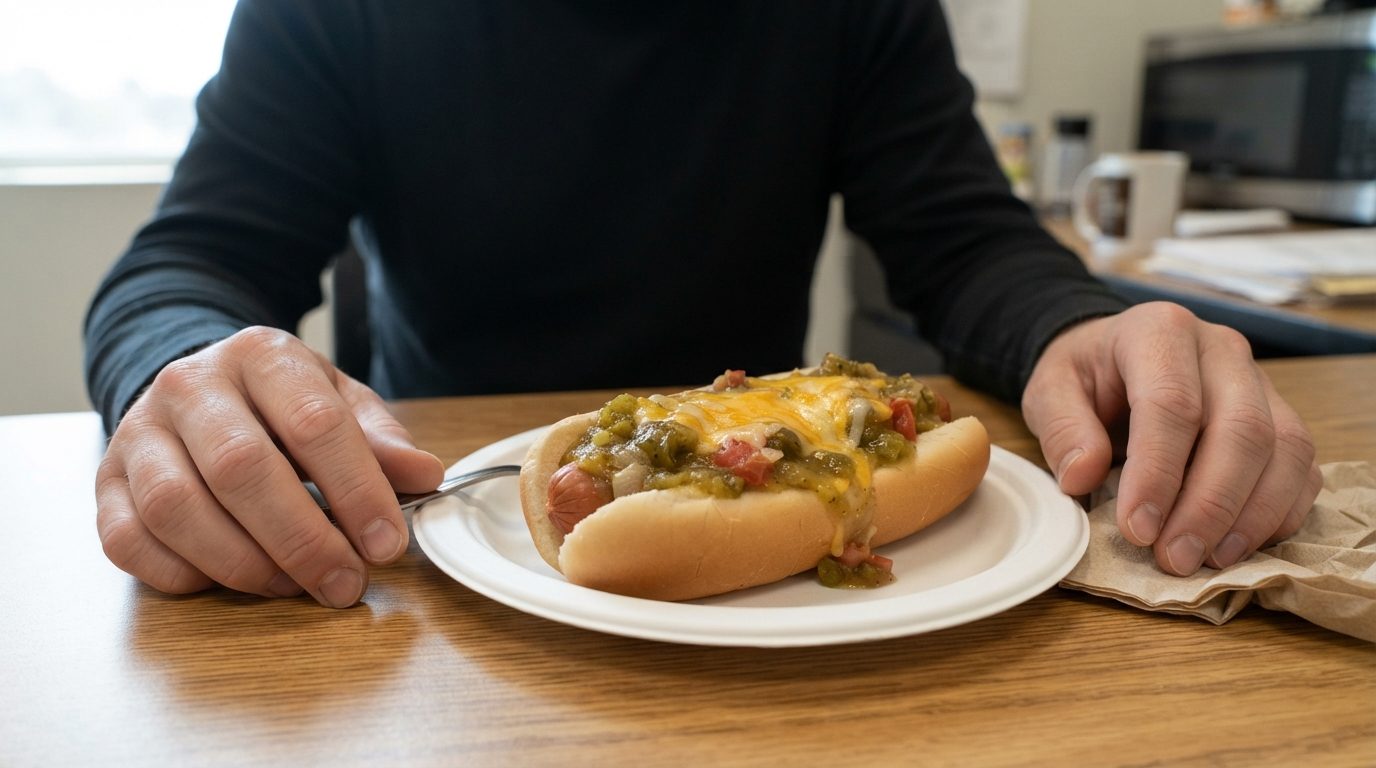
Photo direction: Photograph the assembled dog in cross section or from a slight angle. Make the toasted bun, hot dog, green chile, and melted cheese clearly visible.
Alt text: Toasted split bun holding a hot dog topped with green chile and melted cheese.
Cheese placement is a strategy, not a personality test
Put cheese in contact with the hottest ingredients so it melts into the dog rather than sitting on top as a cold blanket. The question is not whether cheese belongs above or below the chile. The question is whether it has melted and reached more than one heroic inch of frank.
Method one: Shredded cheese under the chile
Scatter shredded Monterey Jack, cheddar, or a blend over the hot dog, then spoon hot green chile over it. The chile's heat helps the cheese soften and settle into the dog. This makes a more integrated, slightly messier bite.
Method two: A cheese slice against the frank
Lay a slice of cheese along one side of the hot dog before adding chile. This creates a distinct cheese layer and can be easier to distribute evenly. If the slice needs help melting, close the bun loosely around the hot dog for a moment before topping it with chile.
If your cheese refuses to melt, the usual culprit is cold ingredients. Start with a hot frank and hot chile, then give the assembled dog a brief warm spell in a skillet with a lid or a toaster oven. Do not keep it there long enough to steam the bun into sadness.
Green chile control separates a great bite from a topping emergency
Add green chile gradually and distribute it along the dog so heat, moisture, and flavor stay balanced. Chile should coat the frank and mingle with the cheese, not collect in a bun corner like an escaped swimming pool.
Taste before you commit
Taste the green chile before assembly. Pepper heat can vary, so adjust the amount to your own tolerance rather than assuming every batch will behave the same way. A hot dog should still taste like a hot dog.
Manage loose sauce
If the chile is thin, let it reduce gently in a pan until it clings more readily. You can also use a slotted spoon to leave excess liquid behind. A clingy chile is desirable here. A puddle is not.
Season with restraint
Let the chile provide most of the seasoning. Taste before adding salt or other spices, since the frank and cheese bring plenty of savory force to the party. Ketchup stays out because its sweetness and acidity steer the bite away from the green chile profile.
The bite test Jason would actually use
A successful bite delivers toasted bun, juicy hot dog, melted cheese, and green chile without requiring a fork. If you need structural engineering before the first bite, the dog has already lost the argument.
- Check the ends: The first and last bites should have some chile and cheese, not just the middle.
- Check the center: The bun should touch the dog cleanly, without a large sauce pocket waiting to evacuate down your wrist.
- Check the melt: Cheese should be softened or melted before the dog hits the plate.
- Check the heat: Green chile should be hot when served. Take care with hot fillings, especially right after simmering.
Common build mistakes and the fixes that rescue dinner
Most failures come from too much liquid, cold cheese, or toppings added without a distribution plan. Fortunately, this is hot dog trouble, not a lunar landing. It is very fixable.
| Mistake | Fix |
|---|---|
| Using an untoasted bun | Toast it lightly so it better resists the chile. |
| Adding a mountain of cheese | Use enough cheese to melt around the dog and chile, not enough to erase both flavors. |
| Pouring chile in one spot | Spoon it in a narrow line along the length of the frank. |
| Adding raw toppings too early | Build the warm layers first, then add a small amount of onion or cilantro at the end. |
| Treating heat as a contest | Choose a chile intensity that lets the frank and cheese remain recognizable. |
Serving notes for a Denver inspired plate
Serve this dog immediately after assembly so the bun stays firm and the cheese stays melted. Green chile waits for nobody, least of all a photo session with twelve garnish decisions.
Keep the side situation crisp and simple. A plain slaw or lightly dressed salad provides contrast without trying to wrestle the chile for attention. On the plate, let the green chile and cheese remain visible. A dog buried under garnish looks less like dinner and more like it lost a fight with a houseplant.
Want more of Jason's hot dog opinions, recipes, and food finds?
Follow @jasonsgrub on Instagram.
FAQ for the green chile dog skeptics
These questions cover the practical choices that determine whether the dog eats cleanly and tastes balanced.
Does a Denver green chile dog need a specific cheese?
No single cheese is required for this home recipe. Choose a melting cheese that complements the frank and chile. Monterey Jack, cheddar, and blends are all workable options.
Should the cheese go under or over the green chile?
Either can work. Put the cheese where it will contact heat and spread across the dog, then judge the result by its melt and bite consistency.
Can I use jarred or canned green chile?
Yes, if you enjoy its flavor and it has a texture that clings to the dog. Adjust the amount and moisture as needed. A container label cannot guarantee a particular heat level.
How do I stop the bun from getting soggy?
Toast the bun, keep the ends from flooding, and use only enough green chile to coat the hot dog without pooling in the bread.
Is ketchup allowed?
Jason's answer is no. This plate is built around green chile, cheese, toasted bun, and hot dog. Ketchup is unnecessary here, and it would pull the flavor in a less interesting direction.
Sources
Enjoyed this? There's more from Jason's Grub.
Follow on Instagram →